SHEDDINGS

Tuesday, July 31, 2012

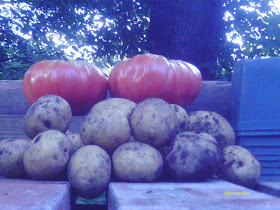
Time for 'taters!

"Aunt" Agnes


'Taters! Got new pertaters!


THE PRODUCE IN QUESTION


Got some 'taters and some Brandywine termaters!
Gonna scrub them 'taters, toss 'em in a pot!
Berl 'em t'il they's ...AWWWKK! WHAT? Umph mrglrmff mrgrlub mfunug....

*Sounds of a smallish, elderly and highly intoxicated woman being removed, kicking and mrglubling from the premises by a very large man in a leather mask.*

[Editors intervention: Our apologies, ladies and gentlemen for yet another unwarranted outburst by Agnes. Yes, indeed, we pulled a few new potatoes and plucked a couple of tomatoes. No need for a Broadway spectacular on the subject.]

Keep watching for the next Farm Girl's Corner when she discusses kale as a fall crop in what I am certain will be excruciating detail. Carry on! 

Thursday, July 26, 2012

FARM GIRL'S CORNER - Important PSA

Hi its me Farm Girl and once again I have to help save certain elements among our readership from their own self destructive tendencies. Folks, its about blackberries.


No, not this no doubt fascinating and apparently useful device. We have nothing to say about this at all.


We refer to the yumptious, scrumptious blackberry found on bushes in the countryside and which make such delicious snacks, pies* and ice creams. This is a BLACK BERRY. It is OK and in fact commendable to pluck them.


This, however, is a Black Beary, and a wise and rational human being will leave him forever unplucked.


"Why, Farm Girl, do you raise this as an issue?"

Well, you see what our friend Mr. Ursus americanus is doing, do you not? He is packing his bear mug with delicious black berries. He likes them as much as we do. In fact, he likes them so much that he feels that they belong to him.


When, as inevitably happens each summer, one berry picker...


Blunders into another berry picker, then bad things are apt to happen...      
These bad things almost never happen to the bear.


Witness this unfortunate and not especially happy lady, Canadian Katy Lin. In Ms. Lin's case the dispute was not over berries, but rather over who was going to be allowed to play in Ms. Lins garden.


The point is, be aware of where you are. If it is bear country - and most of the United states and Canada is exactly that - be aware of your surroundings. Remember that when you are picking berries you are raiding the bear's pantry, at least as far as the bear is concerned.

While black bears are "cute" in some peoples eyes, and appear lovable and cuddly, they are not. A bear is always a bear.

The also have an undeserved reputation for timidity. No, they are not as dangerous as a polar bear or grizzly and many times they will avoid a confrontation with a human. But not always.

Don't be the newspaper article of the day! Make noise while berry picking so you don't startle a bear. If you see one, back away, slowly.

If local laws permit it, take a firearm along.

And if you make a pie, save a slice for me!

You might also wish to check out this tale by Mike Logan, who has had his own ursine encounters. It appears on Saturday Sunshine and can be accessed right HERE:

That is about all that this topic will bear, so as always, thanks for stopping by at Farm Girls Corner!

**************************************************************   

*Woops! Nearly forgot the pies!


Human berry pickers often make juicy delicious pies, bursting with berries and a crisp and tasty crust.


Bears generally eschew the crust.

Friday, July 20, 2012

AN INTERESTING WAY TO USE GARLIC

We like garlic here at the shed, we like it a lot in fact but we like it even more now that Raymond Kukkee over at Incoming BYTES showed us how to grow it correctly. But garlic is a team effort after all, and here is Glory Lennon from the award winning gardening blog Glory's Garden with a simple but useful and delicious suggestion!


How to roast garlic

There was some discussion on Facebook recently on the merits of garlic and one person suggested eating raw garlic at which a few people balked. No this was not suggested to fend off vampires, although I never have seen one while I cook with garlic, but that may be because I rarely cook without garlic. Some folks think the taste of garlic a tad too harsh, but the benefits of this medicinal herb are too great to disregard.

Thus, I came across a way to soften the taste while keeping most of the health benefits and I thought I’d bring it along to you. Why? Because I’m that kind of gal.

Roasting garlic while it is still in the bulb will actually soften the texture as well as the taste. You can literally spread it like butter on bread or for use on vegetables or anything. Want to learn how to do this? Don’t suppose you’d still be here if you didn’t.


How to roast garlic.

1.       Use whole bulbs of garlic. Each average bulb yields about one tablespoon of garlic spread.

2.       Peel some of the outer papery covering but make sure you leave the bulb intact.

3.       Slice off the very top of the bulb (~1/2 inch), just enough to expose the individual garlic cloves.

4.       Drizzle the cut end of the bulb with 1/2 teaspoon olive oil.

5.       Place on cookie sheet or baking pan.

6.       Bake in 350 ℉ for ~40-60 minutes or until lightly browned and cloves are soft.

7.       Allow to cool.

8.       Separate individual cloves using a paring knife.

9.       Squeeze each clove from root end to use.

Nothing could be easier, nothing could be better on warm crusty bread, or on steamed vegetables or…well, anywhere you’d like yummy roasted garlic.


                                              ****************************************

Thank you, Glory! That really looks both simple and delicious. Now march that idea straight off to the Garlic Festival in Saugerties, NY and you be the Belle of the Ball, the Apple of every Eye and the Schmear on every Cracker!

                                             *****************************************

Stay tuned for our next "Children's Hour", wherein Leatherface explains where to take a leek. 

Wednesday, July 18, 2012

WOOT! WOOT!

Howdyyyyyy! Agnes here!


With all this talk about sauerkraut and Cole slaw y'all forgot the most important thing! Y'all forgot the cabbage board! What's a cabbage board you want to know?


There's one, yonder. It's great for slicery of cabbages and shortening overly long fingers. Y'all can git one HERE among other places, there ya go.

Now what would y'all do around here without good old Aunt Aggy?

Have a good 'un and we'll see all y'all next time!


[Editors note: What would we do without good old Aunt Aggy? Sure would be nice to find out!]

Monday, July 16, 2012

FARM GIRL'S CORNER - More cabbage comin' atcha, with a side trip into sauerkraut

Hi again its me, farm Girl! Did you order your fall seeds and plants yet? Well let me remind you again, because it may be almost too late - and in some northern zones is already to late - to order your cabbages.


There are so many reasons to grow a fall crop of cabbages, not the least of which is that these vegetables do better in general growing into cool weather rather than out of it and as a result tend to be heavier, more uniform and many say tastier than their spring counterparts.


This fine example, as our pals at Baker Seed's* remind us, can be made into excellent slaw, and kraut as well.

Ray Kukkee of Incoming BYTES knows something about first rate Sauerkraut and is going to share his excellent recipe with us. (This recipe cannot be found on Unnatural Foods, because there is nothing unnatural about it. So pay attention!)


*Baker seeds, over 1400 heirloom seed varieties!


Do you like sauerkraut?

You'll love this recipe. It's easy and produces an excellent product with a minimum of problems. Even a small half-batch (ten lb. ) with time and some patience will make about 3-4 quarts of tasty sauerkraut!
Cleanliness is absolutely essential. This is a fermented food product and does present opportunities for contamination if adequate care is not taken. . Bacteria convert vegetable sugars into acid, which provides the unique flavour and acts as a preservative. The more care taken in making it, the better it seems to turn out!


For a full 20 lb batch of sauerkraut you will need:
  • 20 lbs. of freshly shredded*cabbage
  • 12 Tablespoons coarse **pickling salt.
  • A sharp knife or kraut cutter.
  • A 5-gallon container. A ceramic or stone crock is ideal, but a glass jar or other suitable container like a clean, food-grade 5 gallon pail will suffice. Do NOT use plastic bags or containers that are not food-grade plastic. * See the precautionary note below on zinc-coated (galvanized) metal containers.
  • Jars & lids for storage or suitable for canning (preserving).


Special Notes: Cabbage, Salt and Containers
  1. *Fresh cabbage usually has more juice and will make a better product without the necessity of adding brine. Cabbage species considered to be "fall storage" may be preferred for this process because of the solid, juicy nature of those cabbage heads right out of the garden,-- but try a batch with earlier summer cabbage too! Red cabbage does ferment well, but results in a less attractive product than white cabbage.
  2. **Iodized table salt is NOT suitable for this process. Iodine can destroy the bacterial ferment. Use only non-iodized pickling salt. Also, Do NOT use more than 12 tablespoons of salt for a 20 lb. batch. More is not better. Excess salt can hinder, and too much salt may prevent fermentation entirely.
  1. CAUTION: Carefully AVOID using galvanized metal containers. Sauerkraut is acidic in nature and release zinc, which can be toxic.


Procedure:

  • Sanitize all equipment including the fermenting container.
  • Finished quantity required is 20 lbs of fresh shredded cabbage, so allow extra weight to allow for defective leaves, waste and core removal
  • Remove all damaged outer leaves and the stem. *watch for insects!
  • Rinse cabbage in cold water, cut the heads in quarters, removing stem and cores.
  • Shred or cut the cabbage uniformly --about the thickness of a quarter. Uniformity is necessary for an even, high-quality ferment.
  • Work in 5 lb. portions. Place 5 lbs of shredded cabbage in your fermenting container and add 3 tablespoons of salt, sprinkling it evenly. Mix the salt into the cabbage and pack it firmly using a masher, clean hands, or a suitable kitchen tool until the salt begins to draw juice from the cabbage. The cabbage will change in appearance as juices are drawn from it.
  • Continue adding the rest of the cabbage in 5 lb. layers, adding salt, mixing and compacting each layer.
  • Finally, mix, press and compact all of the cabbage uniformly and thoroughly, and press down until it is covered with it's own juice.
  • Install a suitably-sized food grade plastic or ceramic dinner- plate and a suitable *weight which will fit neatly inside the ferment vessel and press all of the cabbage beneath the liquid. Wipe down the walls of the mixing vessel carefully with a clean cloth, removing any bits of cabbage.
  • (*Use a heavy food-grade plastic bag full of water, suitable container filled with clean water for a weight, or even bricks in a plastic bag. I use a 1-gallon food-grade plastic ice cream container with it's own lid, filled with salt brine).
  • If there is inadequate liquid to cover the cabbage with an inch or more of it's own juices, it will be necessary to add brine to the ferment. Use 1-1/2 tablespoons of salt to a quart of water. Add only as much brine as you need to cover the cabbage properly.
  • Cover the vessel with a clean cotton cloth tied or otherwise secured to keep out dust, moulds and insects.
  • Note: Keep the ferment at room temperature 70-75F; if it is cold, the batch will either ferment very slowly (perhaps take 6 weeks! ) or if below 60F, not at all. Remember that the longer a ferment takes, the greater the opportunity for contamination and spoilage. Equally, being too warm at 80F+ almost guarantees soft, poor quality, or spoiled sauerkraut.
  • Inspect your ferment in about a week. If the ferment is progressing properly, it should show bubbles around the edges of the liquid and will have a typical fermenting bouquet. Check carefully for any moulds developing around the edges and remove if observed. Remove and clean the weight if necessary, and wipe down the interior walls of the vessel to a clean state with a clean cloth dampened in salt brine as necessary.
  • Keep the fermenting vessel at a stable room temperature for three to four weeks. Do not eat sauerkraut before the ferment is completed!
  • Bubbling will cease when the ferment is finished.
  • Your new batch of properly-fermented sauerkraut should NOT be slimy, smell bad, or look moldy or darkly discoloured. Cabbage properly fermented will typically have a pale 'translucent' look. The taste should be sharply acidic and fresh, typical of excellent sauerkraut. 
Sauerkraut can be cooked, preserved, or eaten as is when the ferment is completed, but aging it for a couple of additional weeks can improve the flavour. If you decide to age your sauerkraut in the ferment container, inspect it regularly and remove any moulds quickly for the highest quality product.
To Store or Preserve your sauerkraut, pack it into clean sterilized jars. Ensure there is enough juice in the jars to cover the fermented cabbage. Sauerkraut will keep for several months if stored in a refrigerator.
To can sauerkraut, fill clean, sterilized jars and remove air bubbles. Top up with juice, allowing a half inch of head space, and install lids reasonably finger-tight. Process pint jars in a boiling water bath for ten minutes and quart jars for 15 minutes. Properly preserved sauerkraut will keep for several years. Enjoy!


**Credits: The original salt/cabbage proportions and cautions used in this recipe may be credited to the Ohio State University Extension Fact sheet on Human Nutrition HYG 5342-97 . The salt ratio is critical for a balanced recipe that ferments completely in the shortest possible time to minimize the opportunity for spoilage.

                                       ****************************************************

Thanks, Raymond! We intend to try this delicious kraut project as soon as we harvest our Megatons! As always, thanks for visiting Farm Girl's Corner!

                                       *****************************************************

Farm Girl's note: Pictured above is the only acceptable method for "smothering ones wiener with kraut". The grotesque and morally reprehensible visual pun which a besotted Uncle Mac inflicts on us all during the Super Bowl Game each year is not. I know that he's beyond befuddlement by the fourth quarter and is already calling the winning quarterback "Bart" even if the Packer's are not playing, but there are things one does not do, and which moreover, do not ever need to be done.

Worse, after we have all admired his wit he flips the kraut back in the warming pan.


Lead photo courtesy of April May Maple who retains all rights:

Lead photo model: April May Maple


Tuesday, July 10, 2012

FARM GIRL'S CORNER - Fall cabbage

Hi! Farm Girl here! I help out a lot in the garden and around the shed and what not. Today I almost helped Uncle Mac a bit more than necessary. There I was, plucking a few stray weeds from the corn patch when I here him bellowing:

"Farm Girl!" Have you seen my pole?"

Good grief, I thought, you mean since breakfast? The old boy's been into the fenugreek again. But when I looked around I saw that he was holding his tackle box and net and looking puzzled.

"In the ammo room, Mac," I told him, "Aggy put it there."

And off he went to drown a few worms.

But today I'd like to tell about the fall crop we're about to put in, green cabbage. A bit early, you may be thinking but no, not in zone 5 where our garden is located.

To grow fall cabbages successfully you of course, need a place to plant them. Cabbages make a great follow up crop in a bed where radishes have been, or peas but beware planting after cauliflower, broccoli or kale; or any other veggies of the brassica genus. Members of this group share the same nutritional requirements and the second crop will suffer as a result.


We selected the heavy duty "Megaton" cabbage, a giant cabbage which happens to be extraordinarily tasty, and which stores well.

Megaton is a widely available variety, our seed happens to come from the Jung Seed company.

As it happens we let a raised bed lie fallow (no spring crop) until it was Megaton time. All we did in spring was turn the bed, work in a lot of compost, some wood ashes and a goodly amount of bone meal. (Cabbages are heavy feeders and particularly fond of phosphorus, hence the bone meal boost.)

We gave the bed a shallow turn over and raking every few weeks to knock down the weeds but otherwise left it alone.

Now, at planting time, we worked in a bit more compost and directly sowed the seeds into the bed. Megaton is a big, rambunctious cabbage and we like to give each one a full square yard in which to grow. As these huge brassicas can top 20 lbs in weight, this is not a waste of growing space.

It is important to mulch the seedlings as soon as they are big enough to tolerate it, preferably with sifted compost but if not, with grass clippings. They will benefit enormously from the cooling and water retention that mulch provides during the hot spells that are bound to occur in August and September.

Megaton cabbages take 90 to 100 days to mature after germination, be sure to water regularly and deeply, they are thirsty veggies.

A side dressing of "Superphosphate" or the like would not be amiss halfway through the growth cycle, particularly if you are trying for an eye popping, blue ribbon giant.

And that's about it for...What the heck??


Leatherface! NO!! You may NOT make your "world famous" stuffed cabbages! You remember all the trouble that caused the last time! Take that child back to wherever you found him right this minute!

Now he'll mope for a week.

Anyway that's the story with fall cabbages here at Farm Girl's Corner! As always, thanks for stopping by!   


Saturday, July 7, 2012

THE CHILDREN'S HOUR WITH LEATHERFACE - Slugs and toads

Hi there kids its you very own favorite cut up, Leatherface! Today I went into town and stopped by the deli counter. Inspired by today's topic, I tried to buy some slug and toad loaf for our sandwiches. Do you know they pretended there is no such thing?! I'll have to make some more I guess. Well have no fear I still have leftover's from the last batch of head cheese I put together after the big train wreck.


Today we are going to talk about slugs and about an inexpensive, even fun way to control them. Why, you ask would we want to control slugs? Well, lets take a peek, shall we?


Yuck! Who wants their leafy greens after these things have been at 'em?


Nasty, are they not? No kids, we do not like Mr. Slug.


We want Mr. Slug gone but this is not an easy mission to accomplish. Oh. many control mechanisms work: Shallow pans full of beer trap some, slug pellets do kill them, and diatomaceous earth keeps them away from areas that have been sprinkled with it.

There is the shear joy of giving them a light salt sprinkle or harpooning them with a sewing needle on the end of a small stick and flipping them over the fence.

Copper flashing tacked around a raised bed or encircling a particular plant works also, but may be too time consuming and/or expensive in a large garden.

Scratching up all garden debris at the end of the season also cuts next years population, but will never eliminate it.


"Gee Leatherface, what's the fun part?"

"Well Billy I'm glad you asked! It is our own old gardening pal, Mr. Toad!"

Toads love to hang out in vegetable gardens and eat all sorts of things that we don't want living in there, but which we'd prefer not to eat ourselves. And toads are low maintenance.

Put a toad in your garden, place a pan of water sunken into the ground so he can hydrate once in a while, try not to step on him and he is likely to stay. Change that water often, slugs obligingly fall in and drown and I'm pretty sure Mr. Toad pees in it as well. The water can get very nasty quite quickly.

Also, you might want to provide Mr. Toad with a home or three in the garden. A toad house, if you will! We have a bunch scattered throughout the garden for the benefit of our warty friends.


What the heck is that? Mr Toad is singing???


Woke up this mornin', I et myself a slug!

Woke up this mornin', I et myself a slug!

Goin' to the toad house gonna have a juicy...

Bug!


OK! The Jim Morrison of toads apparently, and something that will not be a regular feature here at the Shed. We already, for the time being, have Aunt Agnes to tolerate. We do not need a singing toad as well.

Here, should you want more information about toads and slug control, is a somewhat relevant article on the subject. Until next time, this is Leatherface. Thanks as always for stopping by at the Children's Hour! 

GADZUKES!


Dang!

What do you suppose we's fixin' to fry up with a mess of onions tonight?


Did you say: "Zuchinni!" Well you're just so gosh darn smart, now ain'tcha?